지난 편에 이어서, 오늘은 JUCE Framework가 어떤 구조로 이루어져 있길래 이렇게 편리하게 C++ 크로스 플랫폼 개발이 가능한지 좀 더 자세히 살펴볼 것이다. 다행히 JUCE는 오픈소스기 때문에 모든 코드를 다 헤집어 살펴볼 수 있다. 전부 이해할 수 있는지는 이후의 문제지만... 우선은 이전 편에서 만들었던 프로젝트의 코드를 잠깐 짚어보고 가자.
1) JuceHeader.h
/*
   IMPORTANT! This file is auto-generated each time you save your project
    - if you alter its contents, your changes may be overwritten!
    This is the header file that your files should include in order to get all the
    JUCE library headers. You should avoid including the JUCE headers directly in
    your own source files, because that wouldn't pick up the correct configuration
    options for your app.

*/

#pragma once

#include "AppConfig.h"

#include <juce_audio_basics/juce_audio_basics.h>
#include <juce_audio_devices/juce_audio_devices.h>
#include <juce_audio_formats/juce_audio_formats.h>
#include <juce_audio_processors/juce_audio_processors.h>
#include <juce_core/juce_core.h>
#include <juce_cryptography/juce_cryptography.h>
#include <juce_data_structures/juce_data_structures.h>
#include <juce_events/juce_events.h>
#include <juce_graphics/juce_graphics.h>
#include <juce_gui_basics/juce_gui_basics.h>
#include <juce_gui_extra/juce_gui_extra.h>
#include <juce_opengl/juce_opengl.h>
#include <juce_video/juce_video.h>


#if ! DONT_SET_USING_JUCE_NAMESPACE
 // If your code uses a lot of JUCE classes, then this will obviously save you
 // a lot of typing, but can be disabled by setting DONT_SET_USING_JUCE_NAMESPACE.
 using namespace juce;
#endif

#if ! JUCE_DONT_DECLARE_PROJECTINFO
namespace ProjectInfo
{
    const char* const  projectName    = "JUCEPractice1";
    const char* const  versionString  = "1.0.0";
    const int          versionNumber  = 0x10000;
}
#endif
MainComponent.h 파일의 상단에는 JuceHeader.h라는 헤더파일이 덩그러니 하나 선언되어있다. 그 파일을 열어보면 JUCE Framework가 가진 모듈들을 대략 살펴볼 수 있다. 아무래도 Audio Programming에 특화된 Framework다 보니 audio에 관련된 모듈이 많이 있고, 더불어 GUI에 관련된 모듈도 상당히 많이 있다. 헤더의 상단에 주석으로 경고하고 있듯이 이 헤더파일은 자동으로 생성된다. 이를 통해 Projucer에서 module에 대한 설정을 바꿔주면 이 파일이 영향을 받는다는 사실을 유추해볼 수 있겠다.
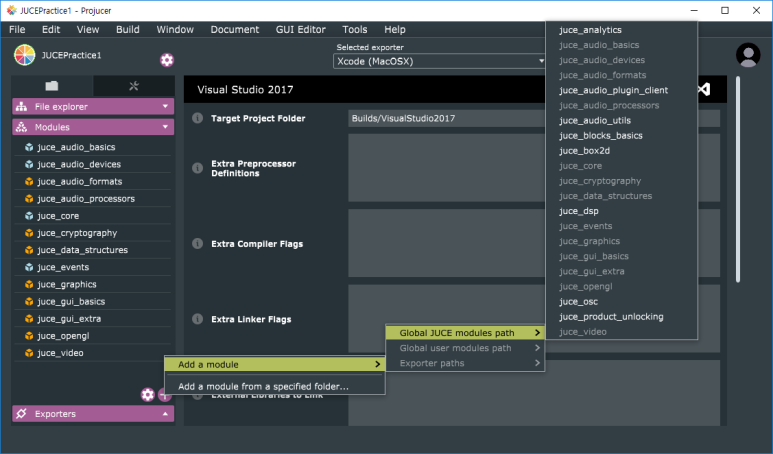
Projucer에 들어가 이번에는 왼쪽 메뉴에서 Modules 항목을 눌러보자. 하위 리스트에 있는 항목들이 방금 전에 확인했었던 JuceHeader.h에 포함된 항목들과 일치한다. 그 외에 추가로 모듈을 더 추가하고 싶다면 '+'버튼을 눌러서 추가하면 된다. 재밌는 것은 우리가 직접 juce module을 만들 수도 있다는 점인데 그 내용에 대해서도 언젠가 다뤄볼 수 있을 것 같다.
2) MainComponent.h
/*
  ==============================================================================

    This file was auto-generated!

  ==============================================================================
*/

#pragma once

#include "../JuceLibraryCode/JuceHeader.h"

//==============================================================================
/*
    This component lives inside our window, and this is where you should put all
    your controls and content.
*/
class MainComponent   : public Component
{
public:
    //==============================================================================
    MainComponent();
    ~MainComponent();

    //==============================================================================
    void paint (Graphics&) override;
    void resized() override;

private:
    //==============================================================================
    // Your private member variables go here...


    JUCE_DECLARE_NON_COPYABLE_WITH_LEAK_DETECTOR (MainComponent)
};
이번에는 MainComponent.h를 살펴보자. 기본적인 C++ Class 문법에 맞게 생성자와 소멸자가 선언되어 있고, paint와 resized라는 메서드가 선언되어있다. Component라는 클래스로부터 상속받은 것들이기 때문에 override 마킹이 되어있다. 매크로로도 무언가 선언되어 있는데, 이름으로 보아 복사방지와 메모리릭을 감지하기 위한 용도라는 것을 알 수 있다. 지금은 중요한 것이 아니니 넘어가도록 하겠다.
Component 클래스는 JUCE Framework의 거의 모든 UI 관련 객체의 base가 되는 클래스이다. 실제 화면에 대한 표시 위치와 영역, 그려질 때의 생김새 그리고 다양한 사용자 이벤트 처리에 대해 선언되어 있다. JUCE는 가장 기본적인 UI Component인 Button부터 시작해서 Label, ComboBox, Slider, ListView등의 수많은 Basic UI Component들이 미리 구현되어 있는데 모두 이 Component 클래스를 상속받아 만들어진 것들이다. 이 멋진 녀석을 들여다보기 위해 Component 클래스가 선언된 파일을 직접 열어서 확인해 볼 수도 있겠지만, 더 좋은 방법은 문서를 확인하는 것이다. 운 좋게도, JUCE Framework는 코드의 퀄리티 만큼이나 Documentation의 정리도 매우 잘 되어 있다. 아래의 링크를 따라가 보자.
https://docs.juce.com/master/classComponent.html
Framework를 배우기 가장 좋은 방법은 문서를 읽는 것이듯, Framework를 사용자들에게 널리 알리기 가장 좋은 방법은 문서화를 잘 하는 것이다. 그런 의미에서 JUCE Framework는 한 번 빠지면 헤어나올 수 없을 정도로 문서화와 Tutorial이 잘 만들어져 있는 Framework이다. 한가할 때는 정말 JUCE Framework가 또 무슨 기능들을 갖고 있나 보고 싶어서 재미로 문서를 읽기도 한다.
Component 클래스가 가진 메서드와 멤버들을 모두 이 자리에서 소개할 수는 없으니, MainComponent가 상속한 두 개의 메서드; paint와 resized에 대해서만 살펴보겠다. JUCE의 문서에는 다음과 같이 소개되어 있다.
virtual void Component::paint ( Graphics & g )
The paint() method gets called when a region of a component needs redrawing, either because the component's repaint() method has been called, or because something has happened on the screen that means a section of a window needs to be redrawn.
Any child components will draw themselves over whatever this method draws. If you need to paint over the top of your child components, you can also implement the paintOverChildren() method to do this.
If you want to cause a component to redraw itself, this is done asynchronously - calling the repaint() method marks a region of the component as "dirty", and the paint() method will automatically be called sometime later, by the message thread, to paint any bits that need refreshing. In JUCE (and almost all modern UI frameworks), you never redraw something synchronously.
화면이 새로고침이 필요할 때마다 이 콜백이 호출된다고 한다. 화면에 직접 그림을 그릴 수 있는 Graphics Context가 넘어오기 때문에 저기에 어떤 그림을 그릴 수 있는지는 Graphics 클래스를 들여다보면 알 수 있을것이라는 정보를 얻었다. 중요하게 짚고 넘어갈 점은 paint가 asyncronous하게 이루어진다는 점이다. Message Thread에서 이를 관리하기 때문에 paint 안에서 repaint를 호출한다고 해서 syncronous하게 동작하지는 않을 것이라고 말해주고 있다.
virtual void Component::resized ( )
A component can implement this method to do things such as laying out its child components when its width or height changes. The method is called synchronously as a result of the setBounds or setSize methods, so repeatedly changing a components size will repeatedly call its resized method (unlike things like repainting, where multiple calls to repaint are coalesced together). If the component is a top-level window on the desktop, its size could also be changed by operating-system factors beyond the application's control.
이 콜백은 setBounds나 setSize 등의 메서드가 호출될 때 syncronous 하게 호출될 것이라고 한다. 만약 Component의 사이즈가 연속적으로 바뀌면 그에 따라 이 resize콜백도 동기적으로 함께 실행될 것이다.
객체지향의 기본오브 베이직이지만 한가지 짚고 넘어가자면, MainComponet는 Component를 상속받음으로써 Component에 구현되어 있는 모든 method를 사용할 수 있게 되었다. 하지만 paint와 resized라는 method에 한해서 MainComponet가 새롭게 이 동작을 재정의(override) 했다. Component 클래스에는 자식 클래스들이 새롭게 재정의해서 쓸 수 있는 method들이 아주 많이 있다. 필요에 따라 하나씩 찾아봐도 좋지만 미리 문서를 읽어보고 할 수 있는 것들이 뭐가 있는지 미리 파악해보는 것도 좋은 공부가 될 것이다.
3) MainComponent.cpp
/*
  ==============================================================================

    This file was auto-generated!

  ==============================================================================
*/

#include "MainComponent.h"

//==============================================================================
MainComponent::MainComponent()
{
    setSize (600, 400);
}

MainComponent::~MainComponent()
{
}

//==============================================================================
void MainComponent::paint (Graphics& g)
{
    // (Our component is opaque, so we must completely fill the background with a solid colour)
    g.fillAll (getLookAndFeel().findColour (ResizableWindow::backgroundColourId));

    g.setFont (Font (16.0f));
    g.setColour (Colours::white);
    g.drawText ("Hello World!", getLocalBounds(), Justification::centred, true);
}

void MainComponent::resized()
{
    // This is called when the MainComponent is resized.
    // If you add any child components, this is where you should
    // update their positions.
}
MainComponent.h에 선언된 것을 토대로 MainComponent.cpp에 구현되어 있는 정의들을 살펴보겠다. 주로 멤버의 초기화를 하는 생성자에서는 이 MainComponent의 사이즈를 설정해준다. 위에서 읽은 문서에 의하면 이 setSize가 불리면 이어서 resized 콜백이 동기적으로 실행된다고 했다. 하지만 지금은 resized에 아무 동작도 정의되어 있지 않고, setSize가 유일한 명령이기 때문에 생성자가 할 일은 끝났다. paint methd의 내용이 눈길을 끄는데 한 줄씩 살펴보면 화면의 중간에 "Hello Wold!"라는 텍스트를 띄우는 코드인 것을 알 수 있다. 함수 인자로 받은 Graphics 객체는 일종의 그림을 그리기 위한 Context혹은 Handle이라고 할 수 있다. 문서에 의하면 이 Graphics Class는 자신의 좌표 공간에 원, 사각형, 선, 텍스트 등을 그리기 위한 함수와 Affine Transform등의 변환 함수 등을 제공한다. 다시 말해 화면에 무언가 그럴싸한 것을 그리고 싶다면, 이 Graphics 클래스를 이용해 무엇이든 할 수 있다.

말하자면, Graphics 클래스의 drawLine method만으로도 이런 그림을 그릴 수 있다는 뜻이다. 물론 회전연산을 하고 Animation을 주는데는 몇 줄의 코드가 더 들어갔지만, 3차원 공간의 모습을 이렇게 2차원에 구현하는 것이 가능하다는 뜻이다. 3D그래픽을 그리기 위해 바로 OpenGL로 넘어가기 보다는 이렇게 2차원 화면에 그림 그리는 것을 몇 번 연습해보면서 좌표공간을 구현하는 것에 익숙해지는 시간을 가지고자 한다. 어느 정도 감각이 생긴 다음부터는 OpenGL로 넘어가도 금방 익숙해질 것이다.
따라서 앞으로 본격적인 구현에 들어가기 전에 몇 편 동안에는 3차원 공간에 대한 기본적인 감각을 익혀볼 수 있는 시간을 가지려고 한다. 하지만 여기에 필요한 수학 지식은 오로지 삼각함수와 행렬 뿐이다. 증명을 위해서는 좀 더 고차원의 수학에 잠시 다녀올 수도 있겠지만 구현에 큰 영향을 줄 일은 없으니 안심해도 좋다.
'개발 > JUCE Framework' 카테고리의 다른 글
| [3D 그래픽 엔진을 만들어보자] - 4.ViewPort의 이해 (0) | 2018.07.29 |
|---|---|
| [3D 그래픽 엔진을 만들어보자] - 3. JUCE GUI 프로그래밍 (0) | 2018.07.01 |
| [3D 그래픽 엔진을 만들어보자] - 1. Juce Framework 튜토리얼 (0) | 2018.06.28 |
| [3D 그래픽 엔진을 만들어보자] - 0. 들어가며 (2) | 2018.06.28 |